
When you order an L-shaped or P-shaped shower bath, you aren’t just buying a tub; you’re buying a spatial puzzle. Get the orientation wrong, and you’re looking at a potential restocking fee, a week-long delay, and a very frustrated plumber.
This guide is the ultimate deep-dive checklist to ensure you never make that mistake. Here is exactly how to identify your bath orientation like a pro before the plumber knocks on your door.
Why “Handing” Is a Non-Negotiable
Standard rectangular baths are usually symmetrical, meaning you can flip them 180 degrees and they’ll still fit. But P-Shape, L-Shape, and Offset Corner baths are “handed.”
These baths have a wider section at one end to give you more room to shower. Because one side is designed to be flush against the wall and the other is curved or angled to face the room, you cannot simply rotate them. If you buy a Left-Hand bath for a Right-Hand space, the “bump-out” section will be facing the wall instead of the room.
The “Master Checklist” for Bathtub Orientation
Follow these steps in order. If you tick every box, you can hit “order” with zero stress.
1. The “Perspective” Check (The Industry Standard)
The most important thing to know is where to stand when deciding. In the UK, orientation is almost always determined by standing at the foot of the bath.
- The Foot: The narrow end where your feet go when you lie down.
- The Head: The wider end (the shower end) where the taps and shower head usually live.
- The Action: Stand at the “foot” and look towards the “head.”
- The Verdict: If the bath widens out to the left, it’s a Left-Hand (LH) bath. If it widens to the right, it’s a Right-Hand (RH) bath.
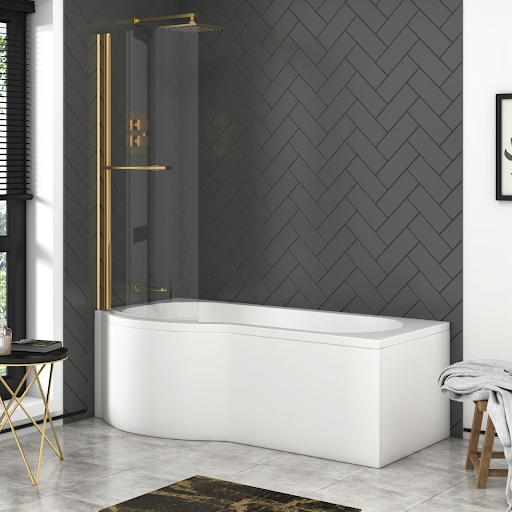
2. The “Letter Shape” Visual Hack
If you’re looking at a floor plan or a bird’s-eye view on a website, use the letter trick. It’s foolproof for P-shape and L-shape baths.
- The P-Shape Test: Look at the bath from above. If it looks like a normal capital ‘P‘, it’s a Left-Hand bath. If it looks like a backward ‘P’ (or a ‘q’), it’s a Right-Hand bath.
- The L-Shape Test: If the bath creates a standard capital ‘L‘, it’s a Left-Hand bath. If it looks like a mirrored ‘L’, it’s a Right-Hand bath.
3. The “Long Wall” Alignment
Look at the corner of the room where the bath will actually sit.
- Left-Hand Setup: The long back wall is behind the bath, and the short “end wall” (where the shower goes) is on your left.
- Right-Hand Setup: The long back wall is behind the bath, and the short “end wall” is on your right.
4. The “Waste and Tap” Confirmation
Check your floor. Where is the current hole for the drain (the waste)?
- In 99% of shower baths, the waste hole is located at the wide (showering) end.
- If your pipes come up from the floor on the right side of the room, you almost certainly need a Right-Hand bath. If you buy a Left-Hand one, your plumber will have to reroute pipes under the floor, which can cost an extra £200–£500 in labour.
Comparison Summary Table
| Identification Method | Left-Hand (LH) | Right-Hand (RH) |
|---|---|---|
| Standing at the foot… | The curve is on your Left | The curve is on your Right |
| Looking from above… | Looks like a P or L | Looks like a backward P or L |
| The Shower Screen… | Attaches to the Left wall | Attaches to the Right wall |
| Main Plumbing side… | Usually on the Left | Usually on the Right |
Pro-Tips for the Perfectionist
If you’re still unsure, grab some masking tape. Tape the outline of the bath you want to buy onto your bathroom floor. If the “wide” part of your tape outline is blocking the toilet or the door, you’ve picked the wrong hand!
- Don’t Forget the Panel: You will need a side panel to hide the underside of the bath. These are also handed. If you buy a Left-Hand bath, you must buy a Left-Hand front panel. They are not interchangeable.
- The Shower Screen Trap: Most P-shape and L-shape baths come with a specific glass screen. These screens are shaped to follow the curve of the bath. A Left-Hand screen will not fit a Right-Hand bath.
- Check the “Return”: The “return” is the little bit of the bath that sticks out into the room. Make sure you have at least 700mm of clearance between the bath’s widest point and the opposite wall/sink so you can actually walk past it!
Final Summary
- Stand at the narrow end.
- Look towards the shower end.
- Identify which side the “bump” is on.
- Match your bath, your panel, and your screen to that side.
By following this checklist, you’ll avoid the “Return Fee” blues and ensure your plumber can get straight to the fun part, perfectly giving you the bathroom you’ve been dreaming of.